How to Set Up Mobile Proxies in ixBrowser: A Step-by-Step Beginner’s Guide
A step-by-step guide to configuring mobileproxy.space mobile proxies in the ixBrowser anti-detect browser. In 60–90 minutes you’ll learn how to buy and connect a proxy, build profiles, automate IP rotation, and verify the setup works smoothly—without errors.
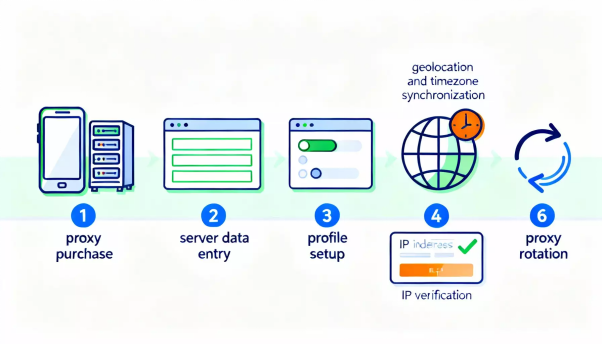
In this step-by-step guide, you’ll learn how to connect mobile proxies from mobileproxy.space to the ixBrowser anti-detect browser, create and configure proxy-bound profiles, set a realistic browser fingerprint, sync geolocation and time zone, and automate IP rotation. By the end, you’ll have a fully working environment for safe, believable work with sites, accesses, and accounts—plus checklists and fixes for common issues.
Who this guide is for: beginners using mobile proxies and an anti-detect browser for the first time, and advanced users who want a structured, optimal setup with automated rotation and verification in 2025.
What you should know upfront: basic computer skills (installing apps, copy/pasting text), understanding of login/password, and the ability to read simple UI hints. No prior networking or proxy knowledge required—we’ll keep it simple.
Time required: 60–90 minutes for your first setup cycle. After that, creating new profiles and connecting additional proxies will take about 5–10 minutes per profile.
Outcome: you’ll have a working ixBrowser profile with a connected mobile proxy, a correct fingerprint, and automated IP rotation as needed—plus a clear process you can repeat for new profiles.
✅ Quick check: At this point, ixBrowser is installed and launches correctly, you can sign in, and you have your proxy details (host, port, login/password or whitelist) and rotation URL ready.
What matters most: a believable profile is about consistency—IP (country/city), languages, time zone, geolocation, fonts, and performance. The more they align, the less likely a site will suspect automation or circumvention. Conflicts increase checks and blocks.
Rotation: avoid rotating too frequently if services monitor stability closely. Start with manual rotation as needed.
Tip: Use one proxy per working “persona”/profile. That keeps cookies and behavior logically tied to one IP pool.
WebRTC should already be routed via proxy to avoid leaks.
Tip: Store the proxy settings alongside the profile name in your password manager notes. It speeds up support and migration.
Manual tweaks: if the profile feels “unnatural” (e.g., macOS with a rare font set and odd language), switch to iXBrowser’s recommended presets.
Tip: Mimic a realistic user journey: visit local sites (regional news, maps) to accumulate relevant cookies.
One rhythm: set a simple rule for when to rotate (before login, after errors, ahead of bulk actions).
Tip: If a site throws frequent captchas, rotate the IP and “warm up”: spend 2–3 minutes casually browsing related pages before key actions.
Introduction
In this step-by-step guide, you’ll learn how to connect mobile proxies from mobileproxy.space to the ixBrowser anti-detect browser, create and configure proxy-bound profiles, set a realistic browser fingerprint, sync geolocation and time zone, and automate IP rotation. By the end, you’ll have a fully working environment for safe, believable work with sites, accesses, and accounts—plus checklists and fixes for common issues.Who this guide is for: beginners using mobile proxies and an anti-detect browser for the first time, and advanced users who want a structured, optimal setup with automated rotation and verification in 2025.
What you should know upfront: basic computer skills (installing apps, copy/pasting text), understanding of login/password, and the ability to read simple UI hints. No prior networking or proxy knowledge required—we’ll keep it simple.
Time required: 60–90 minutes for your first setup cycle. After that, creating new profiles and connecting additional proxies will take about 5–10 minutes per profile.
Outcome: you’ll have a working ixBrowser profile with a connected mobile proxy, a correct fingerprint, and automated IP rotation as needed—plus a clear process you can repeat for new profiles.
Preflight checklist
Before you start, make sure you have everything you need and your computer meets the system requirements. This helps avoid errors during installation and first launch.Required tools and access
- An account on mobileproxy.space with an active mobile proxy plan (choose country, carrier, and duration as needed).
- ixBrowser anti-detect browser with access to your dashboard (account created and app installed).
- A payment method to purchase the proxy (bank card or other supported options).
- An email address for registration and notifications.
System requirements
- Operating system: Windows 10/11 or macOS (current releases, 2025).
- CPU: at least 2 cores; 4+ cores recommended.
- RAM: minimum 8 GB; 16 GB recommended for comfortable multi-profile work.
- Free disk space: 2 GB+ for profile storage and cache.
- Stable internet connection of 10 Mbps or higher.
What to download and install
- Download the ixBrowser installer from the official website.
- Install ixBrowser following the setup wizard: choose the folder, accept terms, complete installation.
- Create an ixBrowser account if you don’t have one, then sign in.
- Prepare your mobile proxy details: server address (host), port, login and password or IP-whitelist access, plus the URL for IP rotation (if available in your mobileproxy.space dashboard).
Backups
Even though the first run is quick, your ixBrowser profile accumulates important data: cookies, local storage, fingerprints. It’s smart to plan backups in advance.- After you create at least one working profile, export it to a file (e.g., JSON or another format supported by your plan and iXBrowser version).
- Store the backup in a protected place (for example, an encrypted, password-protected archive).
- Repeat exports periodically or use built-in cloud sync if it’s included with your license.
✅ Quick check: At this point, ixBrowser is installed and launches correctly, you can sign in, and you have your proxy details (host, port, login/password or whitelist) and rotation URL ready.
Key concepts
Let’s quickly cover the essentials so every setting makes sense.- Mobile proxy — a gateway server that goes online via a mobile network (4G/5G). Its IP looks like a mobile device’s IP, which typically reduces blocks compared to data center proxies.
- IP rotation — changing the external IP address of your proxy. Useful to reset suspicious sessions and avoid captchas or limits.
- Anti-detect browser — a browser that lets you create separate profiles with unique fingerprints (technical parameters), isolate cookies and local data, and manage network settings including proxies.
- Browser fingerprint — a set of parameters: User-Agent, WebGL, Canvas, fonts, language, time zone, screen size, WebRTC, and more. Matching these with IP and geo is critical for plausibility.
- Proxy authentication — access method: login/password or IP-whitelist. With login/password, you enter credentials in iXBrowser. With whitelist, you add your IP in the proxy dashboard.
- WebRTC — a real-time streaming technology. If misconfigured, it can leak your real IP. In an anti-detect browser, set it to route via proxy or to block leaks.
What matters most: a believable profile is about consistency—IP (country/city), languages, time zone, geolocation, fonts, and performance. The more they align, the less likely a site will suspect automation or circumvention. Conflicts increase checks and blocks.
Step 1: Sign up and buy a mobile proxy on mobileproxy.space
Goal
Purchase a mobile proxy and get the connection parameters (host, port, login/password or whitelist) and the IP rotation link.Step-by-step
- Register in the mobileproxy.space dashboard. Provide your email and set a strong password.
- Go to the plans and locations section. Choose the country you need (e.g., Russia, Kazakhstan, Türkiye, EU—match your project’s requirements).
- Select IP rotation options. You’ll usually have manual rotation via link (API) and auto-rotation by interval. For flexibility, choose a plan with API access.
- Choose the authentication type. Login/password is often more convenient if your home IP is dynamic. If you have a static IP, whitelist is fine.
- Pay for the plan. Wait for activation in your dashboard; you’ll see the host, port, and credentials.
- Save the IP change URL (generate/show rotation link). You’ll need this for automation and manual IP changes.
- Check the proxy status in your dashboard: “Active”, expiration date, current IP, and available rotations.
Key notes
Location should match your target sites. If you’re working with a local service in a specific country, pick that region.Rotation: avoid rotating too frequently if services monitor stability closely. Start with manual rotation as needed.
Tip: Use one proxy per working “persona”/profile. That keeps cookies and behavior logically tied to one IP pool.
Expected result
You have the host, port, login/password or whitelist IP, and the IP rotation URL for your mobile proxy.Possible issues and fixes
- No rotation access: check if the option is included in your plan, or upgrade.
- Proxy data missing: refresh the dashboard page and verify payment/renewal.
- Whitelist not working: make sure you added your current external IP, not your local LAN IP.
Step 2: Prepare ixBrowser and set up a base profile
Goal
Create your first iXBrowser profile, configure essential fingerprint parameters, enable leak protection, and prepare the profile for a mobile proxy.Step-by-step
- Open ixBrowser and sign in.
- Go to the Profiles section.
- Click “Create profile” / “New profile”.
- Name the profile. Example: “RU-Mobile-01” or “TR-Mobile-BrandA”. Stick to a consistent naming convention.
- Select the target platform/agent (e.g., Windows/Chrome). For realism, choose a popular combo like Windows + Chrome or macOS + Chrome.
- Open fingerprint settings: enable fingerprint generation for your chosen platform. If there’s an “Auto” or “Recommended” mode, use it.
- Open the WebRTC section. Set it to route via proxy or block leaks so sites can’t see your real IP.
- Set interface language and Accept-Language headers. Match the proxy’s country: e.g., ru-RU for Russia, tr-TR for Türkiye.
- Set the time zone to “Auto by IP” or choose it manually for the proxy’s country (you can fine-tune after connecting the proxy).
- Disable unnecessary plugins. Keep standard font and codec sets generated by iXBrowser.
- Save the profile without launching it. We’re not connecting the proxy yet—this step finishes the fingerprint preparation.
Expected result
You’ve created a new profile with a correct base fingerprint configuration, WebRTC protection enabled, and languages set for the intended geo.Possible issues and fixes
- Profile won’t save: restart ixBrowser, check disk availability, and ensure your antivirus isn’t blocking changes.
- Confusing parameters: choose the “Recommended” or “Auto” preset; you can adjust later after connecting the proxy IP.
Step 3: Connect the mobile proxy to your ixBrowser profile
Goal
Enter the proxy details in the profile and test the connection using ixBrowser’s built-in check.Step-by-step
- Open settings for the profile you created.
- Find the “Proxy”/“Network” section (name may vary by version).
- Select the proxy type. mobileproxy.space usually provides HTTP(S). If SOCKS5 is available, choose it; otherwise, stick with HTTP(S).
- Paste your proxy host into the “Host/Server” field (e.g., mp123.mobileproxy.space).
- Enter the “Port” (e.g., 12345).
- Choose the authentication method: “Login/Password” or “IP (whitelist)”. If using login/password, enter your credentials.
- Click “Check connection” or similar. then optionally cross-verify with an independent proxy checker to confirm the exact geo-location and health of the IP.
- Save the profile changes.
- Launch the profile and open a few pages (e.g., a search engine) to verify browsing works. Don’t log into accounts yet—just test connectivity.
Key notes
Test without accounts to evaluate speed, stability, and site availability for this IP.WebRTC should already be routed via proxy to avoid leaks.
Tip: Store the proxy settings alongside the profile name in your password manager notes. It speeds up support and migration.
Expected result
The profile connects through the mobile proxy: the iXBrowser connection test passes and pages load without errors.Possible issues and fixes
- Authentication failed: check login/password, letter case, and remove extra spaces after copy/paste.
- No connection: temporarily disable VPN/firewall and ensure your antivirus isn’t blocking ixBrowser.
- Whitelist not applied: your external IP changed—update the whitelist in your mobileproxy.space dashboard.
Step 4: Sync geo, time zone, and fingerprint with the mobile proxy
Goal
Align the profile’s key fingerprint parameters with the mobile IP’s geography and language to increase site trust.Step-by-step
- Determine the IP’s geo: run the profile and search for a tool that shows your IP’s city and country. Note the city/region.
- Close the browser window and return to the profile settings in ixBrowser.
- Set “Time zone” to “Auto by IP” or manually select the city’s time zone.
- Set “System language” and “Accept-Language” to the region’s language (e.g., ru-RU; optionally add en-US second).
- In “Geolocation”, choose “Use by IP”/“Automatic” or enter coordinates for the real IP city. If there’s an “Emulation” mode, enable city-level accuracy.
- Check “Fonts” and “Plugins”: keep the standard preset for your platform. Avoid exotic setups if your IP is from a typical region.
- Ensure “WebRTC” is routed via proxy. For “Canvas/WebGL”, enable the light noise iXBrowser suggests—unique enough without going overboard.
- Save the profile and relaunch it.
- Verify that site interfaces, local time, and system time match the IP region’s time zone.
Key notes
Consistency is everything. Language, time, geo, and IP provider should look coherent.Manual tweaks: if the profile feels “unnatural” (e.g., macOS with a rare font set and odd language), switch to iXBrowser’s recommended presets.
Tip: Mimic a realistic user journey: visit local sites (regional news, maps) to accumulate relevant cookies.
Expected result
Your profile reflects the IP logic: sites see a correct time zone, language, geolocation, and device type.Possible issues and fixes
- Time mismatch: adjust the time zone manually and relaunch the profile.
- Pages switch languages: set two languages—regional first, English second—so sites adapt correctly.
- WebRTC still shows your IP: re-check “via proxy” mode and disable any extensions that alter WebRTC.
Step 5: IP rotation and automation
Goal
Set up safe, predictable IP changes manually and/or automatically to reduce captchas and blocks without raising suspicion.Step-by-step
- Open the profile in ixBrowser and go to proxy settings.
- Find the field or section for “Change IP URL” (if supported by your iXBrowser version). Paste the rotation URL from your mobileproxy.space dashboard.
- Save the profile. Check that ixBrowser can call this URL (the request is usually made from your system).
- If there’s no direct URL integration, create a bookmark in the browser with the rotation link or set up a hotkey that calls the URL via an external script/utility. Alternatively, open your system browser and visit the link when needed.
- Define rotation rules: trigger manually before sensitive steps, or set periodic auto-rotation (if your proxy and workflow support it).
- Run a test: call the rotation URL, wait 5–15 seconds (sometimes up to 30), then refresh ‘what is my ip’ and confirm the IP changed.
- Document the wait time after rotation—that’s your operational guideline (e.g., “wait 15 seconds after pressing”).
Key notes
Don’t over-rotate. Frequent IP changes on a single site can look suspicious.One rhythm: set a simple rule for when to rotate (before login, after errors, ahead of bulk actions).
Tip: If a site throws frequent captchas, rotate the IP and “warm up”: spend 2–3 minutes casually browsing related pages before key actions.
Expected result
You can change IP on demand or automatically according to your plan—and you can verify the change.Possible issues and fixes
- IP doesn’t change: confirm the correct URL, wait long enough, and check you haven’t hit your rotation limit.
- Logged out after rotation: some sites bind sessions to IP. Rotate before login or at safe moments.